Setting up alerts on the Bolt Cloud
Creating an Alert on the Bolt Cloud
-
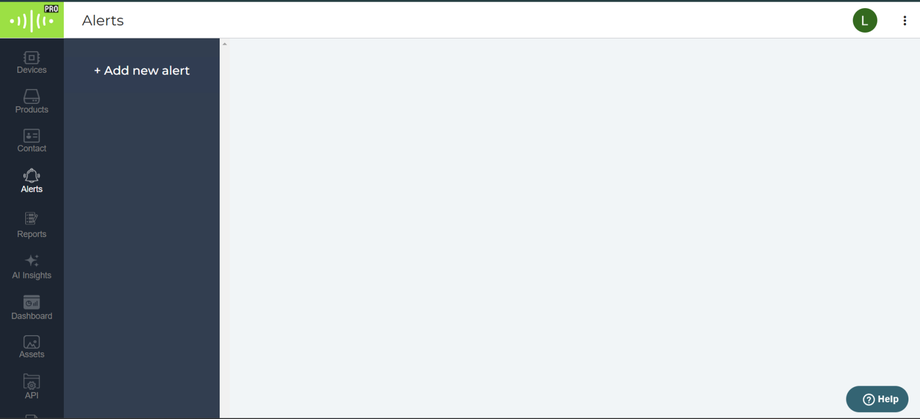
Log into the Bolt Cloud and navigate to the Alerts tab on the left hand side.
-
Click on the "Add new alert" button. You will be redirected to the alert configurations page.
-
Click on the "+" button to start configuring your alert.

-
Types of Alerts that Can Be Set Up:
-
Push Notification (Android/IOS)
-
SMS Notification
-
Email Notification
-
WhatsApp Notification
-
Phone Call Notification
-
-
Fields to Be Configured for Creating Alerts:
-
Alert Name: A unique name for the alert to identify it later.
-
Condition: Define the condition under which a notification should be sent.
-
Data: If you choose Data, you will need to specify the following:
-
The parameter to be monitored ie Temperature or Humidity.
-
The comparison operation (e.g., greater than, less than, equal to).
-
The value against which the parameter will be compared.
-
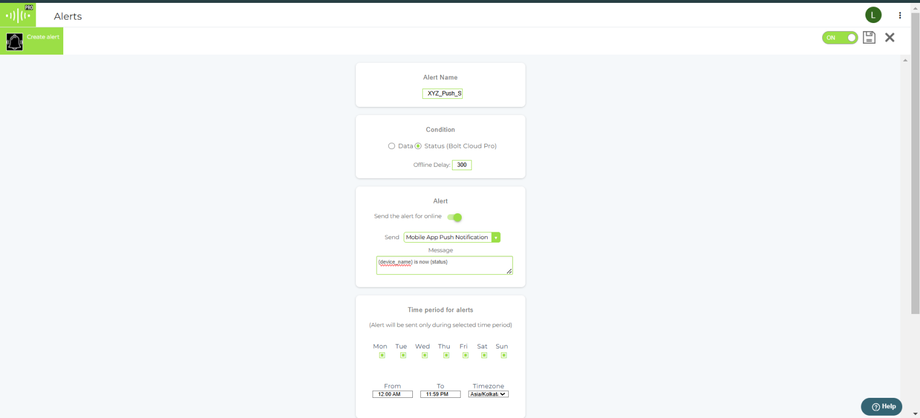
- Status: If you select a status alert, specify the time duration to wait after the device goes offline before triggering the alert. (Note that the number that you put will be in seconds. Eg: Entering 300 will trigger the message after 5 minutes)
-
-
Alert Notification Type: Choose the type of alert notification to be sent. E.g.: Push, SMS etc.
-
Alert Message: Define the message that will be sent when the alert is triggered.
-
-
Alert Message Templates:
-
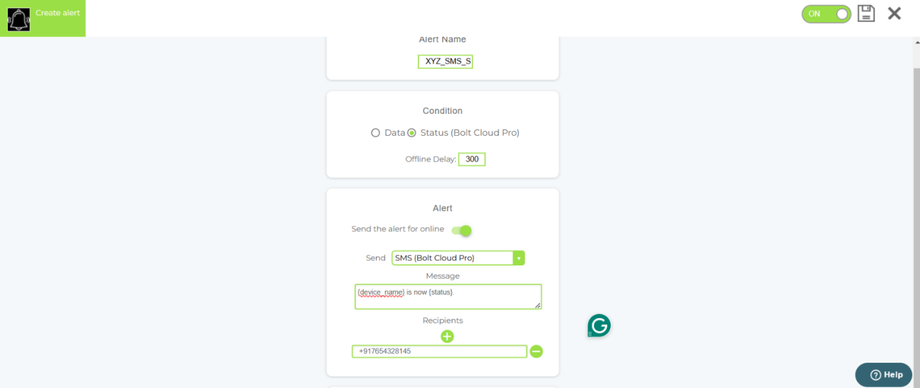
For Push Notification/WhatsApp/SMS/Email "Status Alert": {device_name} is now {status}.
-
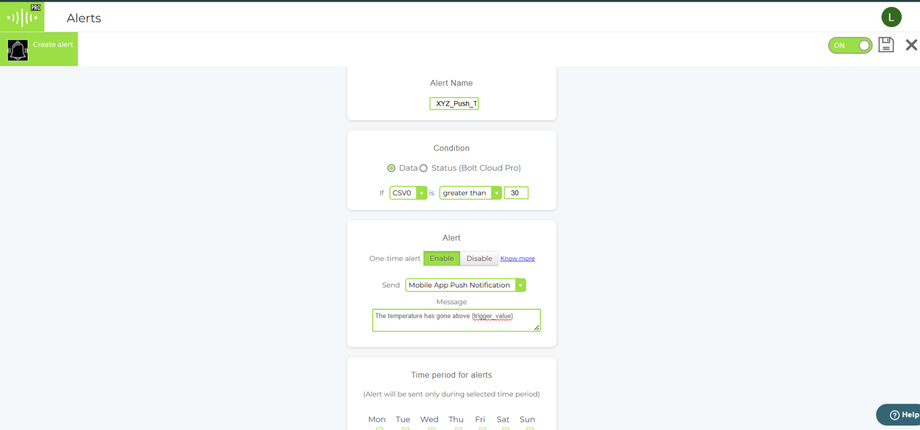
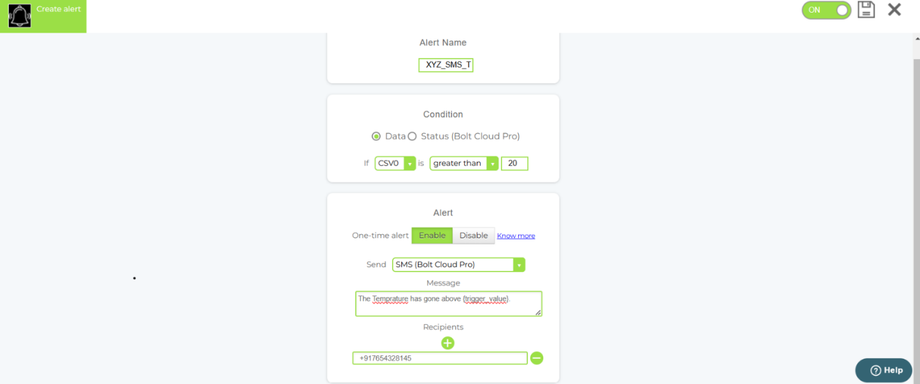
For Push Notification/SMS/Email/WhatsApp "Temperature High" Threshold Alert: The temperature has gone above {trigger_value}.
-
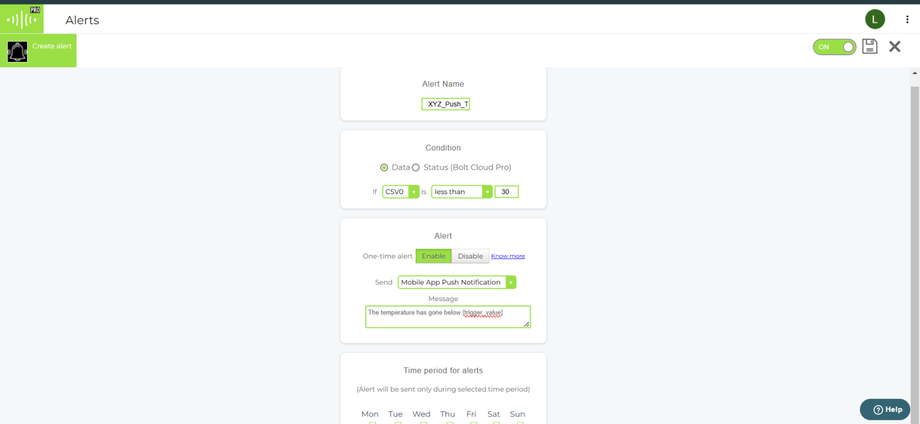
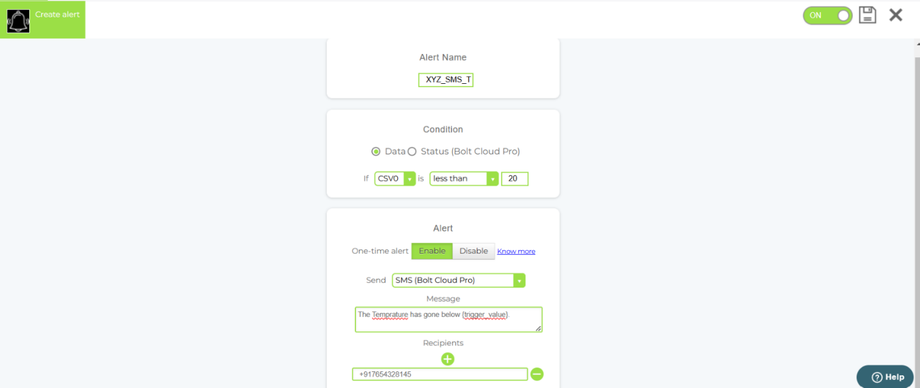
For Push Notification/SMS/Email/WhatsApp "Temperature Low" Threshold Alert: The temperature has gone below {trigger_value}.
-
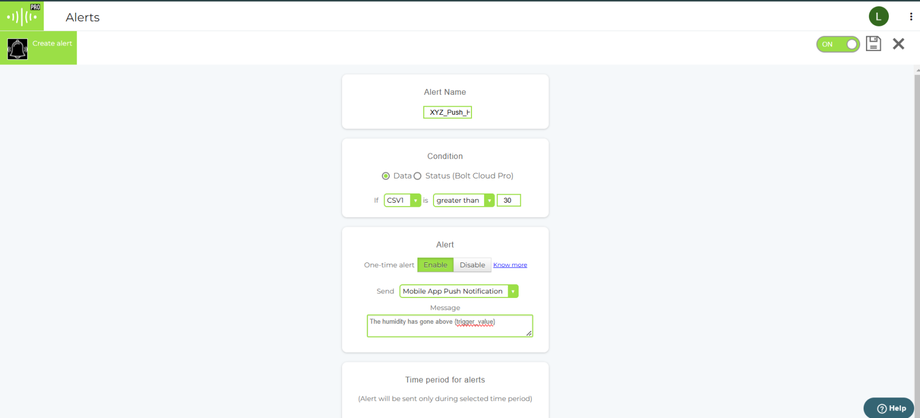
For Push Notification/SMS/Email/WhatsApp "Humidity High" Threshold Alert: The humidity has gone above {trigger_value}.
-
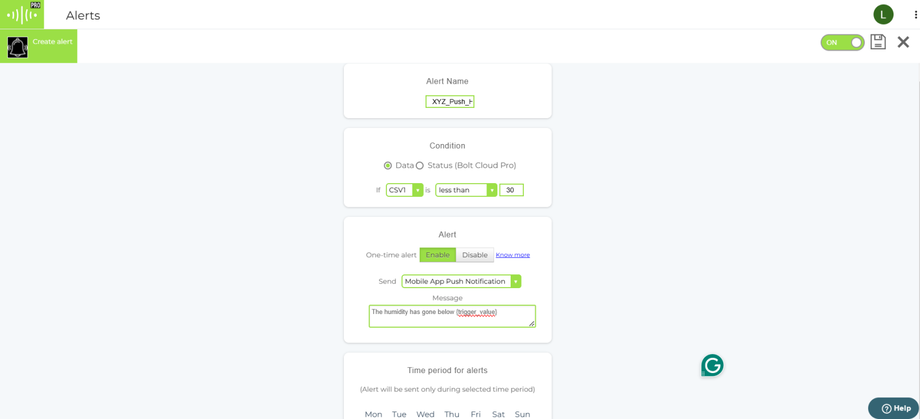
For Push Notification/SMS/Email/WhatsApp "Humidity Low" Threshold Alert: The humidity has gone below {trigger_value}.
NOTE: Items in curly braces should remain unchanged to avoid errors.
-


Steps to set Push Notification Alert:
-
- Add Alert Name: Use a consistent naming template for your device alerts. Sample templates include:
- DeviceName_PUSH_Status: It will provide Push notification when device is Online or Offline.
- DeviceName_PUSH_HL (Humidity Low – when humidity drops below a certain threshold)
- DeviceName_PUSH_HH (Humidity High – when humidity exceeds a certain threshold)
- DeviceName_PUSH_TL (Temperature Low – when temperature drops below a certain point)
- DeviceName_PUSH_TH (Temperature High – when temperature rises above a certain point)
- Replace DeviceName with a short, identifiable name for the device you want to set up the push notification alert for.
- Alternatively, you can choose any custom alert name that suits your needs.
- Add Alert Name: Use a consistent naming template for your device alerts. Sample templates include:
Note: Alert Name Can not be renamed after alert is created
Selecting Pins
-
-
- Data : Below "Condition" For Humidity and Temperature alerts you have to select this Pin.
- In the Dropdown next to "If" choose :
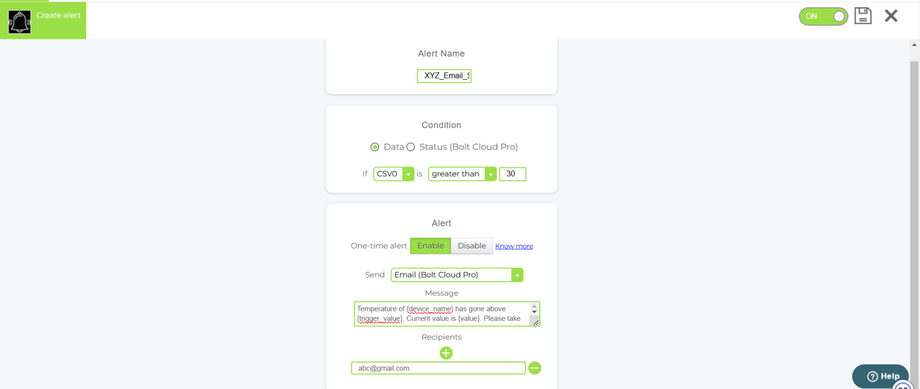
- "CSV0" for setting up "Temperature High or Temperature Low" thresholds.
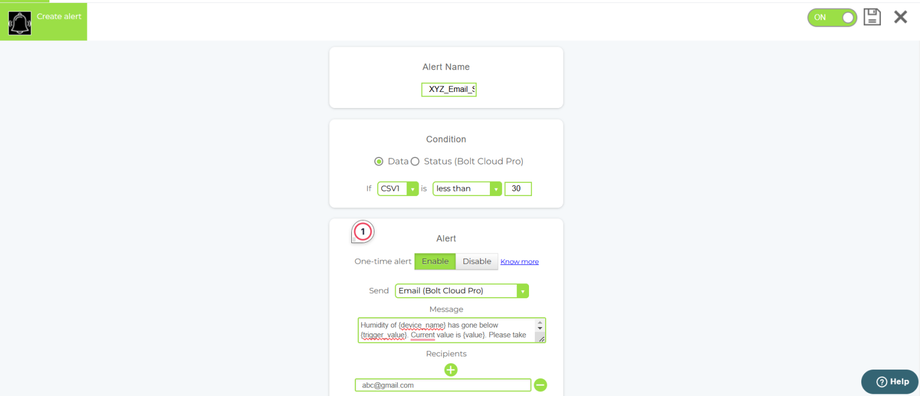
- "CSV1" for setting up "Humidity High and Humidity Low" thresholds.
- In the next dropdown
- choose "greater than" for setting up "Temperature High and Humidity High" thresholds.
- Choose "less than" for setting up "Temperature Low and Humidity Low" thresholds
- In the Dropdown next to "If" choose :
- Status Pin: Below "Condition" for getting online/offline Push notification alert you have to select this Pin.
- Data : Below "Condition" For Humidity and Temperature alerts you have to select this Pin.
-
-
-
-
- Offline delay: In this field specify the time duration to wait after the device goes offline before triggering the alert (Note that the number that you put will be in seconds. Eg: Entering 300 will trigger the message after 5 minutes).
-
- Changes to Be Done in the "Alert" Box:
- Online Status Alert: Enable "Send the alert for online" option for getting the alert for when the device comes back online after being offline.
- Threshold Alerts: Enable "One-time alert" option for setting the Threshold Alert.
- From the dropdown next to "Send" , choose "Mobile App Push Notification".
- In the Message body, use the sample message template mentioned above in the "Alert Message Templates".
-
- Changes to Be Done in the Time Period for Alerts:
- Keep the "Time Period for Alerts" box unchanged if you want to receive alerts daily.
- You can change it according to your preference.
- Enable the alert button on the top right and click "Save Alert" button next to it. Only enabled alerts will monitor device data and send notifications.
- Screenshots for setting up different push notifications:
- Push Notification Status Alert: Save the created alert first before moving on to the next.
- Push Notification Temperature Low: Save the created alert first before moving on to the next.
- Push Notification Temperature High: Save the created alert first before moving on to the next.
- Push Notification Humidity Low: Save the created alert first before moving on to the next.
- Push Notification Humidity High: Save the created alert first before moving on to the next.


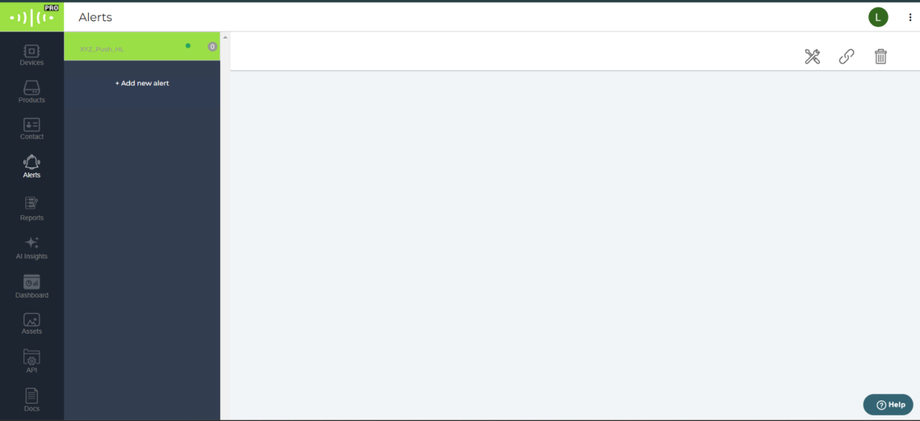
- After saving, you will be redirected back to the Alerts tab where your newly created alert will be displayed
- The alert you created will be listed in the sidebar.

- Click on the second icon on the top right corner to link your device with the alert for which you want to receive push notifications. You can link multiple devices to receive notifications for the same threshold value configured in the alert. If you want different threshold values, you must follow the same process again.

Note: Make sure to follow the below steps when setting up any type of threshold alert. If you miss any step, you won’t hear Buzzer sound
- After linking the device to the alert go to Devices section.
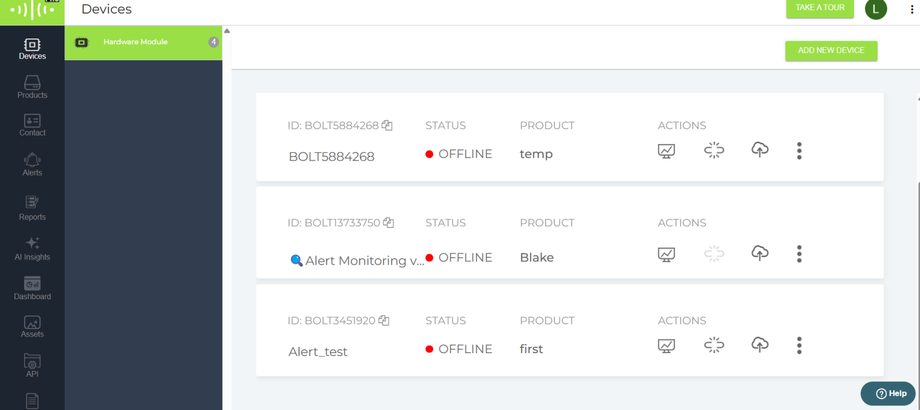
- Find the device you’ve linked to the alert. In the Actions section, click on the first desktop icon to view the device — this will redirect you to a new page.

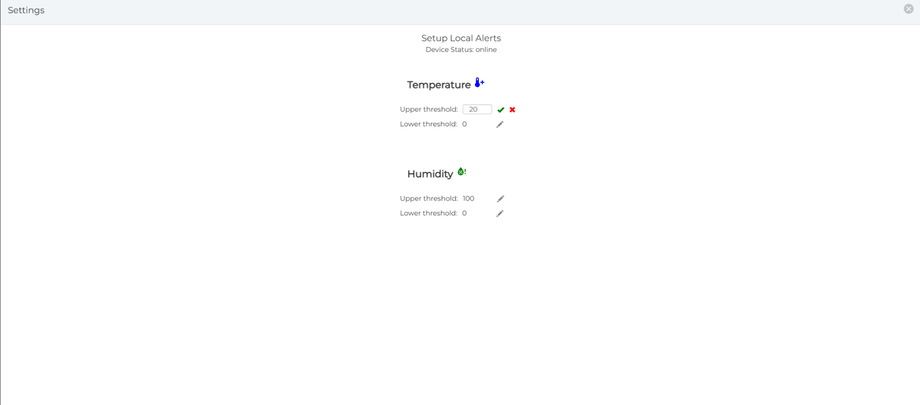
- Click on the "Setup Local Alerts" button. A popup will appear where you can change the thresholds for receiving device buzzer alerts. In the Upper Threshold field, enter the range above which you want to receive buzzer alerts. In the Lower Threshold field, enter the range below which you want to receive buzzer alerts
Note: The threshold values entered here should match the threshold values you used when creating the alerts.

-
To modify the threshold values, click on the pencil icon. After making the changes, click the green checkmark icon to save the updated threshold values.
- A Popup will come on the top to notify that the threshold value is updated.


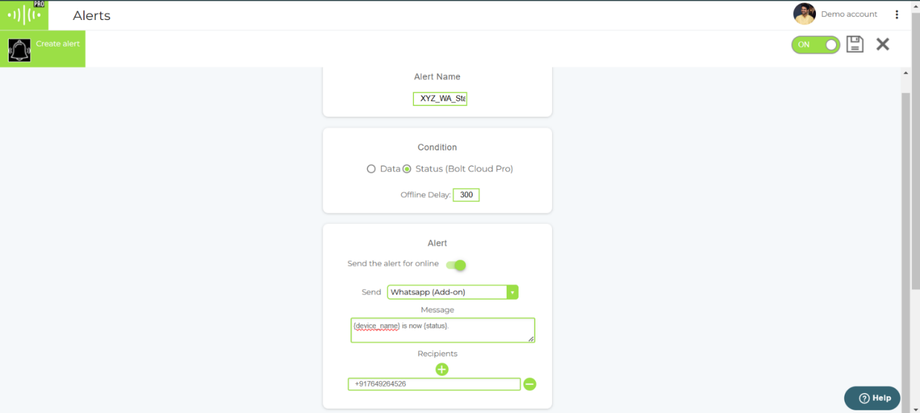
Steps to set WhatsApp Alert:
-
- Add Alert Name: Use a consistent naming template for your device alerts. Sample templates include:
- DeviceName_WA_Status: It will provide WhatsApp notification when device is Online or Offline.
- DeviceName_WA_HL (Humidity Low – when humidity drops below a certain threshold)
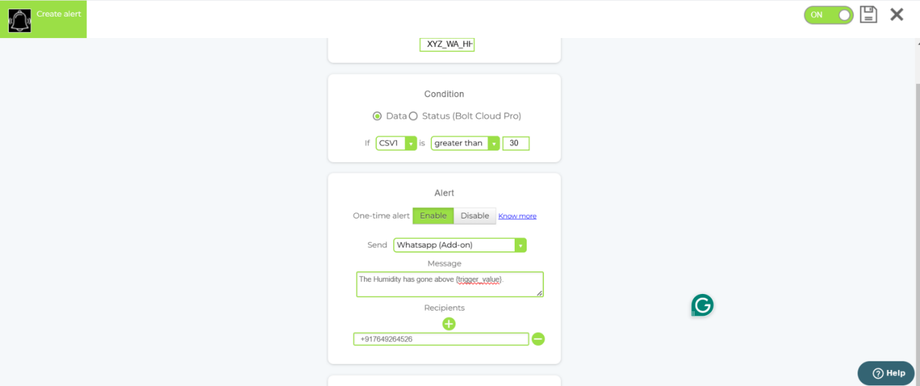
- DeviceName_WA_HH (Humidity High – when humidity exceeds a certain threshold)
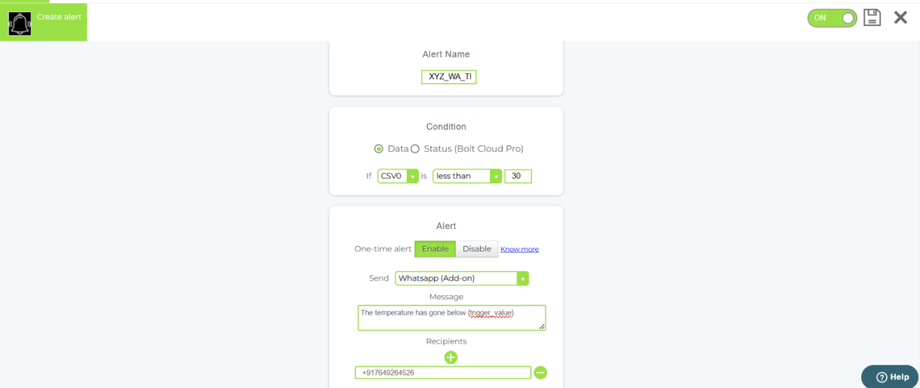
- DeviceName_WA_TL (Temperature Low – when temperature drops below a certain point)
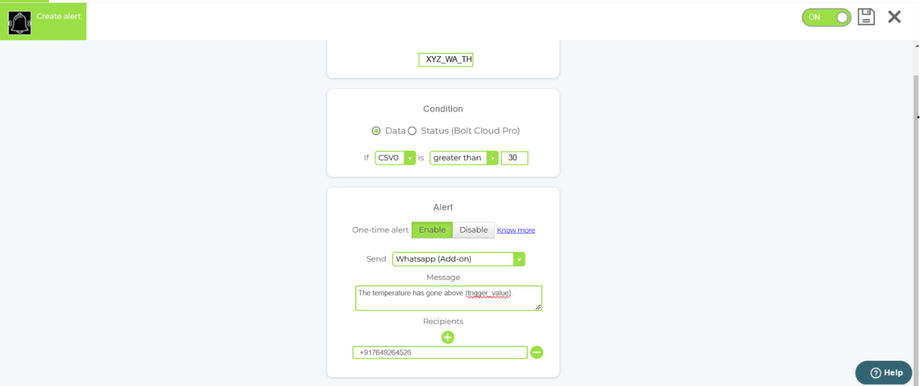
- DeviceName_WA_TH (Temperature High – when temperature rises above a certain point)
- Replace DeviceName with a short, identifiable name for the device you want to set up the WhatsApp notification alert for.
- Alternatively, you can choose any custom alert name that suits your needs.
- Add Alert Name: Use a consistent naming template for your device alerts. Sample templates include:
Note: Alert Name Can not be renamed after alert is created
Selecting Pins
-
-
- Data : Below "Condition" For Humidity and Temperature alerts you have to select this Pin.
- In the Dropdown next to "If" choose :
- "CSV0" for setting up "Temperature High or Temperature Low" thresholds.
- "CSV1" for setting up "Humidity High and Humidity Low" thresholds.
- In the next dropdown
- choose "greater than" for setting up "Temperature High and Humidity High" thresholds.
- Choose "less than" for setting up "Temperature Low and Humidity Low" thresholds
- In the Dropdown next to "If" choose :
- Status Pin: Below "Condition" for getting online/offline WhatsApp notification alert you have to select this Pin.
- Data : Below "Condition" For Humidity and Temperature alerts you have to select this Pin.
-
-
-
-
- Offline delay: In this field specify the time duration to wait after the device goes offline before triggering the alert (Note that the number that you put will be in seconds. Eg: Entering 300 will trigger the message after 5 minutes).
-
- Changes to Be Done in the Alert Box:
- Status Alert: Enable "Send the alert for online" option for getting the alert for when the device comes back online after being offline.
- Threshold Alerts: Enable "One-time alert" option for setting the Threshold Alert.
- From the dropdown next to "Send" , choose "WhatsApp (Add-on)".
- In the Message body, use the sample template mentioned above.
- In the Recipients section :
-
- Use the + icon to add the WhatsApp number of the person you want to send alerts to.
- You can choose multiple recipients.
- Make sure to click the tick icon after adding the number.
- To remove a number, click the - icon in front of the number.
- Changes to Be Done in the Time Period for Alerts:
- Keep the "Time Period for Alerts" box unchanged if you want to receive alerts daily.
- You can change it according to your preference.
- Enable the alert button on the top right and click Save button next to it. Only enabled alerts will monitor device data and send notifications.
- Screenshots for setting up different WhatsApp notifications:
- WhatsApp Status Alert: Save the created alert first before moving on to the next.
- WhatsApp Temperature Low: Save the created alert first before moving on to the next.
- WhatsApp Temperature High: Save the created alert first before moving on to the next.
- WhatsApp Humidity Low: Save the created alert first before moving on to the next.

- WhatsApp Humidity High: Save the created alert first before moving on to the next.


- After saving, you will be redirected back to the Alerts tab where your newly created alert will be displayed
- The alert you created will be listed in the sidebar.

- Click on the second icon on the top right corner to link your device with the alert for which you want to receive push notifications. You can link multiple devices to receive notifications for the same threshold value configured in the alert. If you want different threshold values, you must follow the same process again.


Note: Make sure to follow the below steps when setting up any type of threshold alert. If you miss any step, you won’t hear Buzzer sound.
- After linking the device to the alert go to Devices section.
- Find the device you’ve linked to the alert. In the Actions section, click on the first desktop icon to view the device — this will redirect you to a new page.
- Click on the Setup Local Threshold button. A popup will appear where you can change the thresholds for receiving Buzzer alerts. In the Upper Threshold field, enter the range above which you want to Buzzer receive alerts. In the Lower Threshold field, enter the range below which you want to receive Buzzer alerts.
Note: The threshold values entered here should match the threshold values you used when creating the alerts .
-
To modify the threshold values, click on the pencil icon. After making the changes, click the green checkmark icon to save the updated threshold values.
- A Popup will come on the top to notify that the threshold value is updated.
Steps to set SMS Alert:
-
- Add Alert Name: Use a consistent naming template for your device alerts. Sample templates include:
- DeviceName_SMS_Status: It will provide SMS notification when device is Online or Offline.
- DeviceName_SMS_HL (Humidity Low – when humidity drops below a certain threshold)
- DeviceName_SMS_HH (Humidity High – when humidity exceeds a certain threshold)
- DeviceName_SMS_TL (Temperature Low – when temperature drops below a certain point)
- DeviceName_SMS_TH (Temperature High – when temperature rises above a certain point)
- Replace DeviceName with a short, identifiable name for the device you want to set up the SMS notification alert for.
- Alternatively, you can choose any custom alert name that suits your needs.
- Add Alert Name: Use a consistent naming template for your device alerts. Sample templates include:
Note: Alert Name Can not be renamed after alert is created
Selecting Pins
-
-
- Data : Below "Condition" For Humidity and Temperature alerts you have to select this Pin.
- In the Dropdown next to "If" choose :
- "CSV0" for setting up "Temperature High or Temperature Low" thresholds.
- "CSV1" for setting up "Humidity High and Humidity Low" thresholds.
- In the next dropdown
- choose "greater than" for setting up "Temperature High and Humidity High" thresholds.
- Choose "less than" for setting up "Temperature Low and Humidity Low" thresholds
- In the Dropdown next to "If" choose :
- Status Pin: Below "Condition" for getting online/offline SMS notification alert you have to select this Pin.
- Data : Below "Condition" For Humidity and Temperature alerts you have to select this Pin.
-
-
-
-
- Offline delay: In this field specify the time duration to wait after the device goes offline before triggering the alert (Note that the number that you put will be in seconds. Eg: Entering 300 will trigger the message after 5 minutes).
-
-
-
- Changes to Be Done in the Alert Box:
-
-
- Status Alert: Enable "Send the alert for online" option for getting the alert for when the device comes back online after being offline.
- Threshold Alerts: Enable "One-time alert" option for setting the Threshold Alert.
- From the dropdown next to "Send" , choose "SMS(Bolt Cloud Pro)".
- In the Message body, use the sample template mentioned above.
- In the Recipients section :
-
- Use the + icon to add the SMS number of the person you want to send alerts to.
- You can choose multiple recipients.
- Make sure to click the tick icon after adding the number.
- To remove a number, click the - icon in front of the number.
- Changes to Be Done in the Time Period for Alerts:
- Keep the "Time Period for Alerts" box unchanged if you want to receive alerts daily.
- You can change it according to your preference.
- Enable the alert button on the top right and click Save button next to it. Only enabled alerts will monitor device data and send notifications.
- Screenshots for setting up different SMS notifications:
- SMS Status Alert: Save the created alert first before moving on to the next.
- SMS Temperature Low: Save the created alert first before moving on to the next.
- SMS Temperature High: Save the created alert first before moving on to the next.
- SMS Humidity Low: Save the created alert first before moving on to the next.
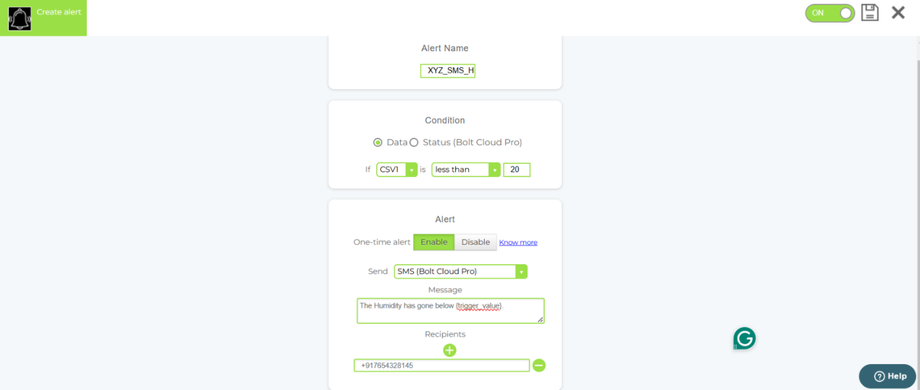
- SMS Humidity High: Save the created alert first before moving on to the next.


- After saving, you will be redirected back to the Alerts tab where your newly created alert will be displayed
- The alert you created will be listed in the sidebar.
- Click on the second icon on the top right corner to link your device with the alert for which you want to receive push notifications. You can link multiple devices to receive notifications for the same threshold value configured in the alert. If you want different threshold values, you must follow the same process again.


Note: Make sure to follow the below steps when setting up any type of threshold alert. If you miss any step, you won’t hear Buzzer sound.
- After linking the device to the alert go to Devices section.
- Find the device you’ve linked to the alert. In the Actions section, click on the first desktop icon to view the device — this will redirect you to a new page.
- Click on the Setup Local Threshold button. A popup will appear where you can change the thresholds for receiving Buzzer alerts. In the Upper Threshold field, enter the range above which you want to receive Buzzer alerts. In the Lower Threshold field, enter the range below which you want to receive Buzzer alerts
Note: The threshold values entered here should match the threshold values you used when creating the alerts .
-
To modify the threshold values, click on the pencil icon. After making the changes, click the green checkmark icon to save the updated threshold values.
- A Popup will come on the top to notify that the threshold value is updated.
Steps to set Email Alert:
-
- Add Alert Name: Use a consistent naming template for your device alerts. Sample templates include:
- DeviceName_Email_Status: It will provide Email notification when device is Online or Offline.
- DeviceName_Email_HL (Humidity Low – when humidity drops below a certain threshold)
- DeviceName_Email_HH (Humidity High – when humidity exceeds a certain threshold)
- DeviceName_Email_TL (Temperature Low – when temperature drops below a certain point)
- DeviceName_Email_TH (Temperature High – when temperature rises above a certain point)
- Replace DeviceName with a short, identifiable name for the device you want to set up the Email notification alert for.
- Alternatively, you can choose any custom alert name that suits your needs.
- Add Alert Name: Use a consistent naming template for your device alerts. Sample templates include:
Note: Alert Name Can not be renamed after alert is created
Selecting Pins
-
-
- Data : Below "Condition" For Humidity and Temperature alerts you have to select this Pin.
- In the Dropdown next to "If" choose :
- "CSV0" for setting up "Temperature High or Temperature Low" thresholds.
- "CSV1" for setting up "Humidity High and Humidity Low" thresholds.
- In the next dropdown
- choose "greater than" for setting up "Temperature High and Humidity High" thresholds.
- Choose "less than" for setting up "Temperature Low and Humidity Low" thresholds
- In the Dropdown next to "If" choose :
- Status Pin: Below "Condition" for getting online/offline Email notification alert you have to select this Pin.
- Data : Below "Condition" For Humidity and Temperature alerts you have to select this Pin.
-
-
-
-
- Offline delay: In this field specify the time duration to wait after the device goes offline before triggering the alert (Note that the number that you put will be in seconds. Eg: Entering 300 will trigger the message after 5 minutes).
-
-
-
- Changes to Be Done in the Alert Box:
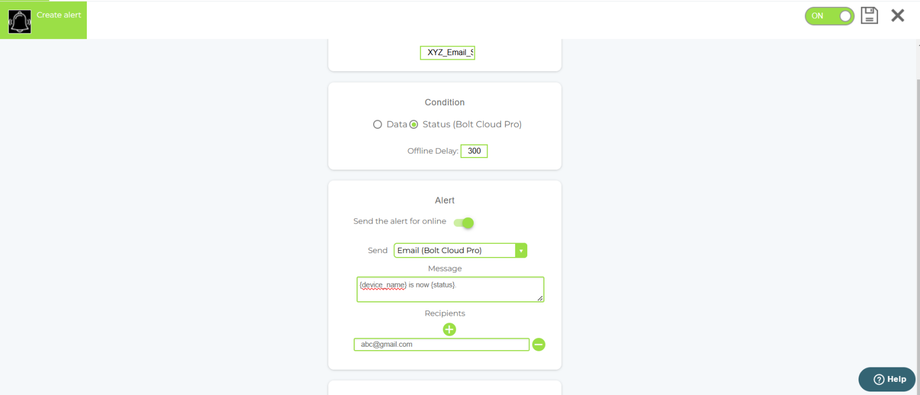
- Status Alert: Enable "Send the alert for online" option for getting the alert for when the device comes back online after being offline.
- Threshold Alerts: Enable "One-time alert" option for setting the Threshold Alert.
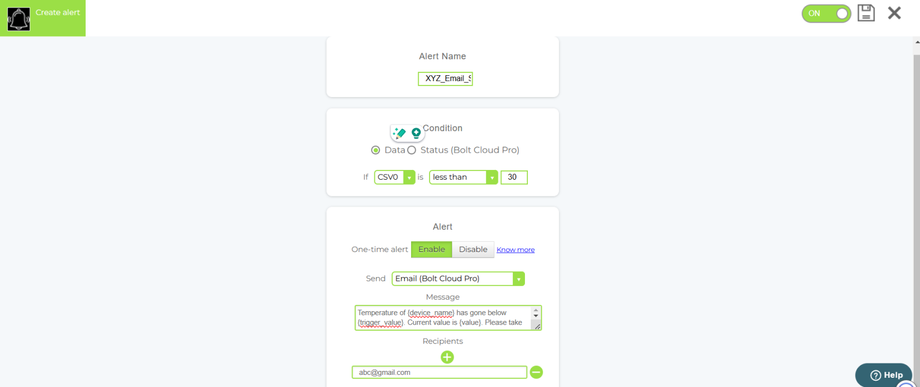
- From the dropdown next to "Send" , choose "Email(Bolt Cloud Pro)".
- In the Message body, use the sample template mentioned above.
- In the Recipients section :
- Changes to Be Done in the Alert Box:
- Use the + icon to add the email ID of the person you want to send alerts to.
- You can choose multiple recipients.
- Make sure to click the tick icon after adding the email ID.
- To remove a email ID, click the - icon in front of the email.
- Changes to Be Done in the Time Period for Alerts:
- Keep the "Time Period for Alerts" box unchanged if you want to receive alerts daily.
- You can change it according to your preference.
- Enable the alert button on the top right and click Save button next to it. Only enabled alerts will monitor device data and send notifications.
- Screenshots for setting up different Email notifications:
- Email Status Alert: Save the created alert first before moving on to the next.
- Email Temperature Low: Save the created alert first before moving on to the next.
- Email Temperature High: Save the created alert first before moving on to the next.
- Email Humidity Low: Save the created alert first before moving on to the next.
- Email Humidity High: Save the created alert first before moving on to the next.


- After saving, you will be redirected back to the Alerts tab where your newly created alert will be displayed
- The alert you created will be listed in the sidebar.
- Click on the second icon on the top right corner to link your device with the alert for which you want to receive push notifications. You can link multiple devices to receive notifications for the same threshold value configured in the alert. If you want different threshold values, you must follow the same process again.
Note: Make sure to follow the below steps when setting up any type of threshold alert. If you miss any step, you won’t hear Buzzer sound .
- After linking the device to the alert go to Devices section.
- Find the device you’ve linked to the alert. In the Actions section, click on the first desktop icon to view the device — this will redirect you to a new page.
- Click on the Setup Local Threshold button. A popup will appear where you can change the thresholds for receiving Buzzer alerts. In the Upper Threshold field, enter the range above which you want to receive Buzzer alerts. In the Lower Threshold field, enter the range below which you want to receive Buzzer alerts
Note: The threshold values entered here should match the threshold values you used when creating the alerts .
-
To modify the threshold values, click on the pencil icon. After making the changes, click the green checkmark icon to save the updated threshold values.
- A Popup will come on the top to notify that the threshold value is updated.
- After linking the device to the alert go to Devices section.
Changing Alert Configurations
-
Navigate to the Alerts tab on the Bolt Cloud.
-
Select the alert you want to modify.
-
Click on the "Configure this alert" button on the top right.
-
Make the necessary changes and click Save.
-
You can also disable the alert if needed.
-
After saving, you will be redirected back to the Alerts tab.
Adding Devices to Alerts
Note: The device must be linked to a product for data collection and monitoring.
-
Go to the Alerts tab and select the alert you want to add a device to.
-
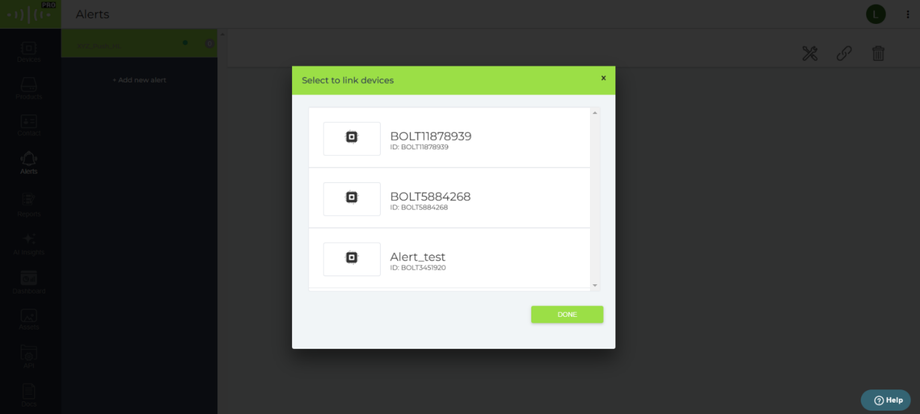
Click on the "Link" button on the top right.
-
A popup will show all devices linked to your account.
-
Select the device you want to add and click Done.
-
The device will be successfully linked to the alert.
Enabling/Disabling Recurring Status Alert
One-Time Status Alert feature that allows you to enable or disable recurring status alerts.
When you enable the One-Time Alert, you will no longer receive repeated offline alerts. This is especially useful when you’re already aware that the device is offline—such as during maintenance or known downtime.
Once you're ready to resume monitoring, you can simply disable the One-Time Alert to start receiving repeated alerts again if the device goes offline while in use.
Steps on how you can do it:
- Go to the Alerts tab and select the Status Alert.
- Click on the Fork icon (the first icon at the top right corner).
- This will take you to another page where you'll find an option called One-time Alert.
Click the Enable button, then click the Save icon in the top right corner (just to the left of the cross icon).
This will stop the recurring status alerts.
- If you want to start receiving recurring alerts again, follow the same steps, but click the Disable button under the One-time Alert option, and then click the Save icon again.


Removing a Device from an Alert
-
Go to the Alerts tab and select the alert.
-
In the device list, click the "Unlink" button next to the device you want to remove.
-
The device will be successfully removed from the alert.
Deleting an Alert
-
Navigate to the Alerts tab and select the alert you want to delete.
-
Click on the "Delete" button on the top right.
-
The alert will be successfully deleted from your account.
Viewing Alert History
The alert history view provides a log of all triggered alerts, including:
-
The alert name.
-
The device that triggered the alert.
-
The time the alert was sent.
-
The message content of the alert.
To view alert history:
-
Go to the Alerts tab.
-
Click on the hamburger icon on the top right.
-
Select "Alert History" from the dropdown menu.
-
You will be redirected to the Alert History view.
