Steps for programming the Blake Atmega via Programmer (When OTA is not working)
Please note that these steps are to be followed when the OTA (Over-The-Air) update is not working or when the device needs to be programmed manually.
The update process involves two main stages:
-
Burning the Bootloader – to correctly set the fuse bits on the microcontroller.
-
Uploading the Firmware – to flash the latest firmware version on the device.
Important:
Both steps are essential. Skipping the bootloader step may cause the device to malfunction since the fuse bits may not be configured properly.
1. Burning the Bootloader
Hardware Required:
-
USBasp programmer
-
Bolt IoT device PCB
Connections between USBasp and Bolt IoT PCB:
| USBasp Pin | Bolt PCB Pin |
|---|---|
| 1 | MISO |
| 2 | VCC |
| 3 | SCK |
| 4 | MOSI |
| 5 | RESET |
| 6 | GND |
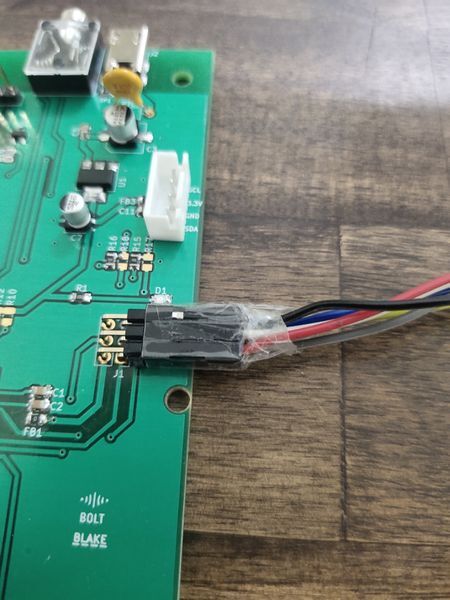
Procedure:
-
Connect the USBasp programmer to the Bolt IoT PCB as per the pin mapping above (Image Attached).
-
Open Arduino IDE on your system.
-
Navigate to Tools → Board and select Arduino UNO.
-
Under Tools → Programmer, select USBasp.
-
Click on “Burn Bootloader” to set the fuse bits correctly.
Once this step is complete, the bootloader will be successfully burned into the device.
2. Uploading the Firmware
Procedure:
-
Disconnect and reconnect the USBasp connected to the Bolt IoT PCB (same as above).
-
Open Command Prompt in Windows.
-
Enter the following command after editing the paths as per your setup:
"PATH_TO_AVRDUDE_FILE/avrdude" "-C PATH_TO_AVRDUDE_CONF_FILE/avrdude.conf" -v -patmega328p -cusbasp -Pusb "-Uflash:w:PATH_TO_FIRMWARE_FILE\FIRMWARE_FILENAME:i" -
Make sure the firmware file you are uploading is with bootloader.
-
Press Enter to execute the command.
When the upload completes successfully:
-
You will see a “SUCCESS” message in the terminal.
-
The buzzer on the Bolt IoT device will beep momentarily to indicate that the firmware has been updated successfully.
3. Updating the offset for the device
Procedure:
- Ensure the device is setup and connected to the cloud.
- Get the API Key of the connected cloud account and the Device ID.
- Run the following API command to set the offset for the device:
- Temperature offset = 0
https://cloud.boltiot.com/remote/API_KEY/serialWR?data=TC10 &deviceName=DEVICE_ID - Humidity Offset = 0
https://cloud.boltiot.com/remote/API_KEY/serialWR?data=HC10 &deviceName=DEVICE_ID
- Temperature offset = 0
- Once you run both the commands, power off the device and power it back on. At the time of boot up of the device you can verify if the offset values for both temperature and humidity should display as set.