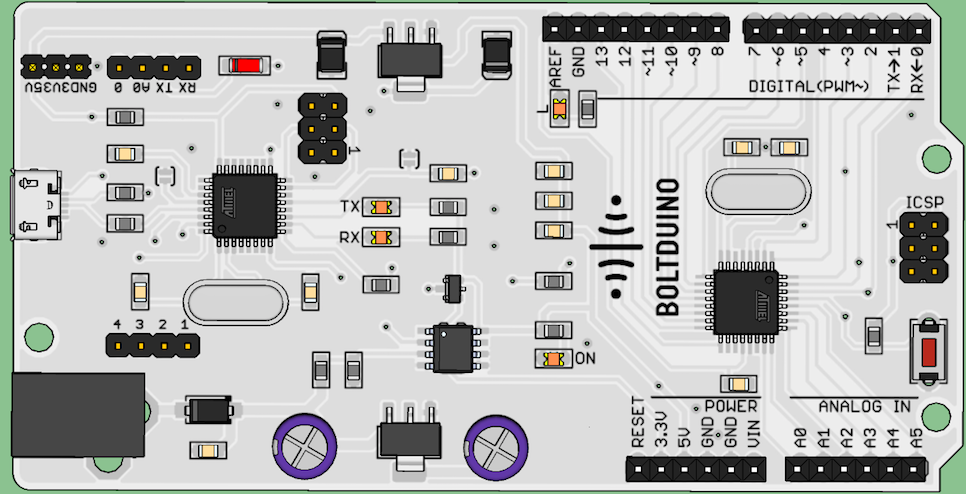
What is Boltduino?
Make your Arduino projects IoT ready. Make them on Boltduino.
The Boltduino is our take on the open-source electronics platform, Arduino. Read more about Arduino here. While we believe that you can build some really awesome projects around the Arduino UNO, making these projects IoT ready can be quite tedious.
We designed the Boltduino such that you can instantly port all Arduino projects to it, and make these projects IoT ready. We did this by re-designing the Arduino UNO R2 to have 2 key features required for IoT.
- Internet Connectivity
- OTA update
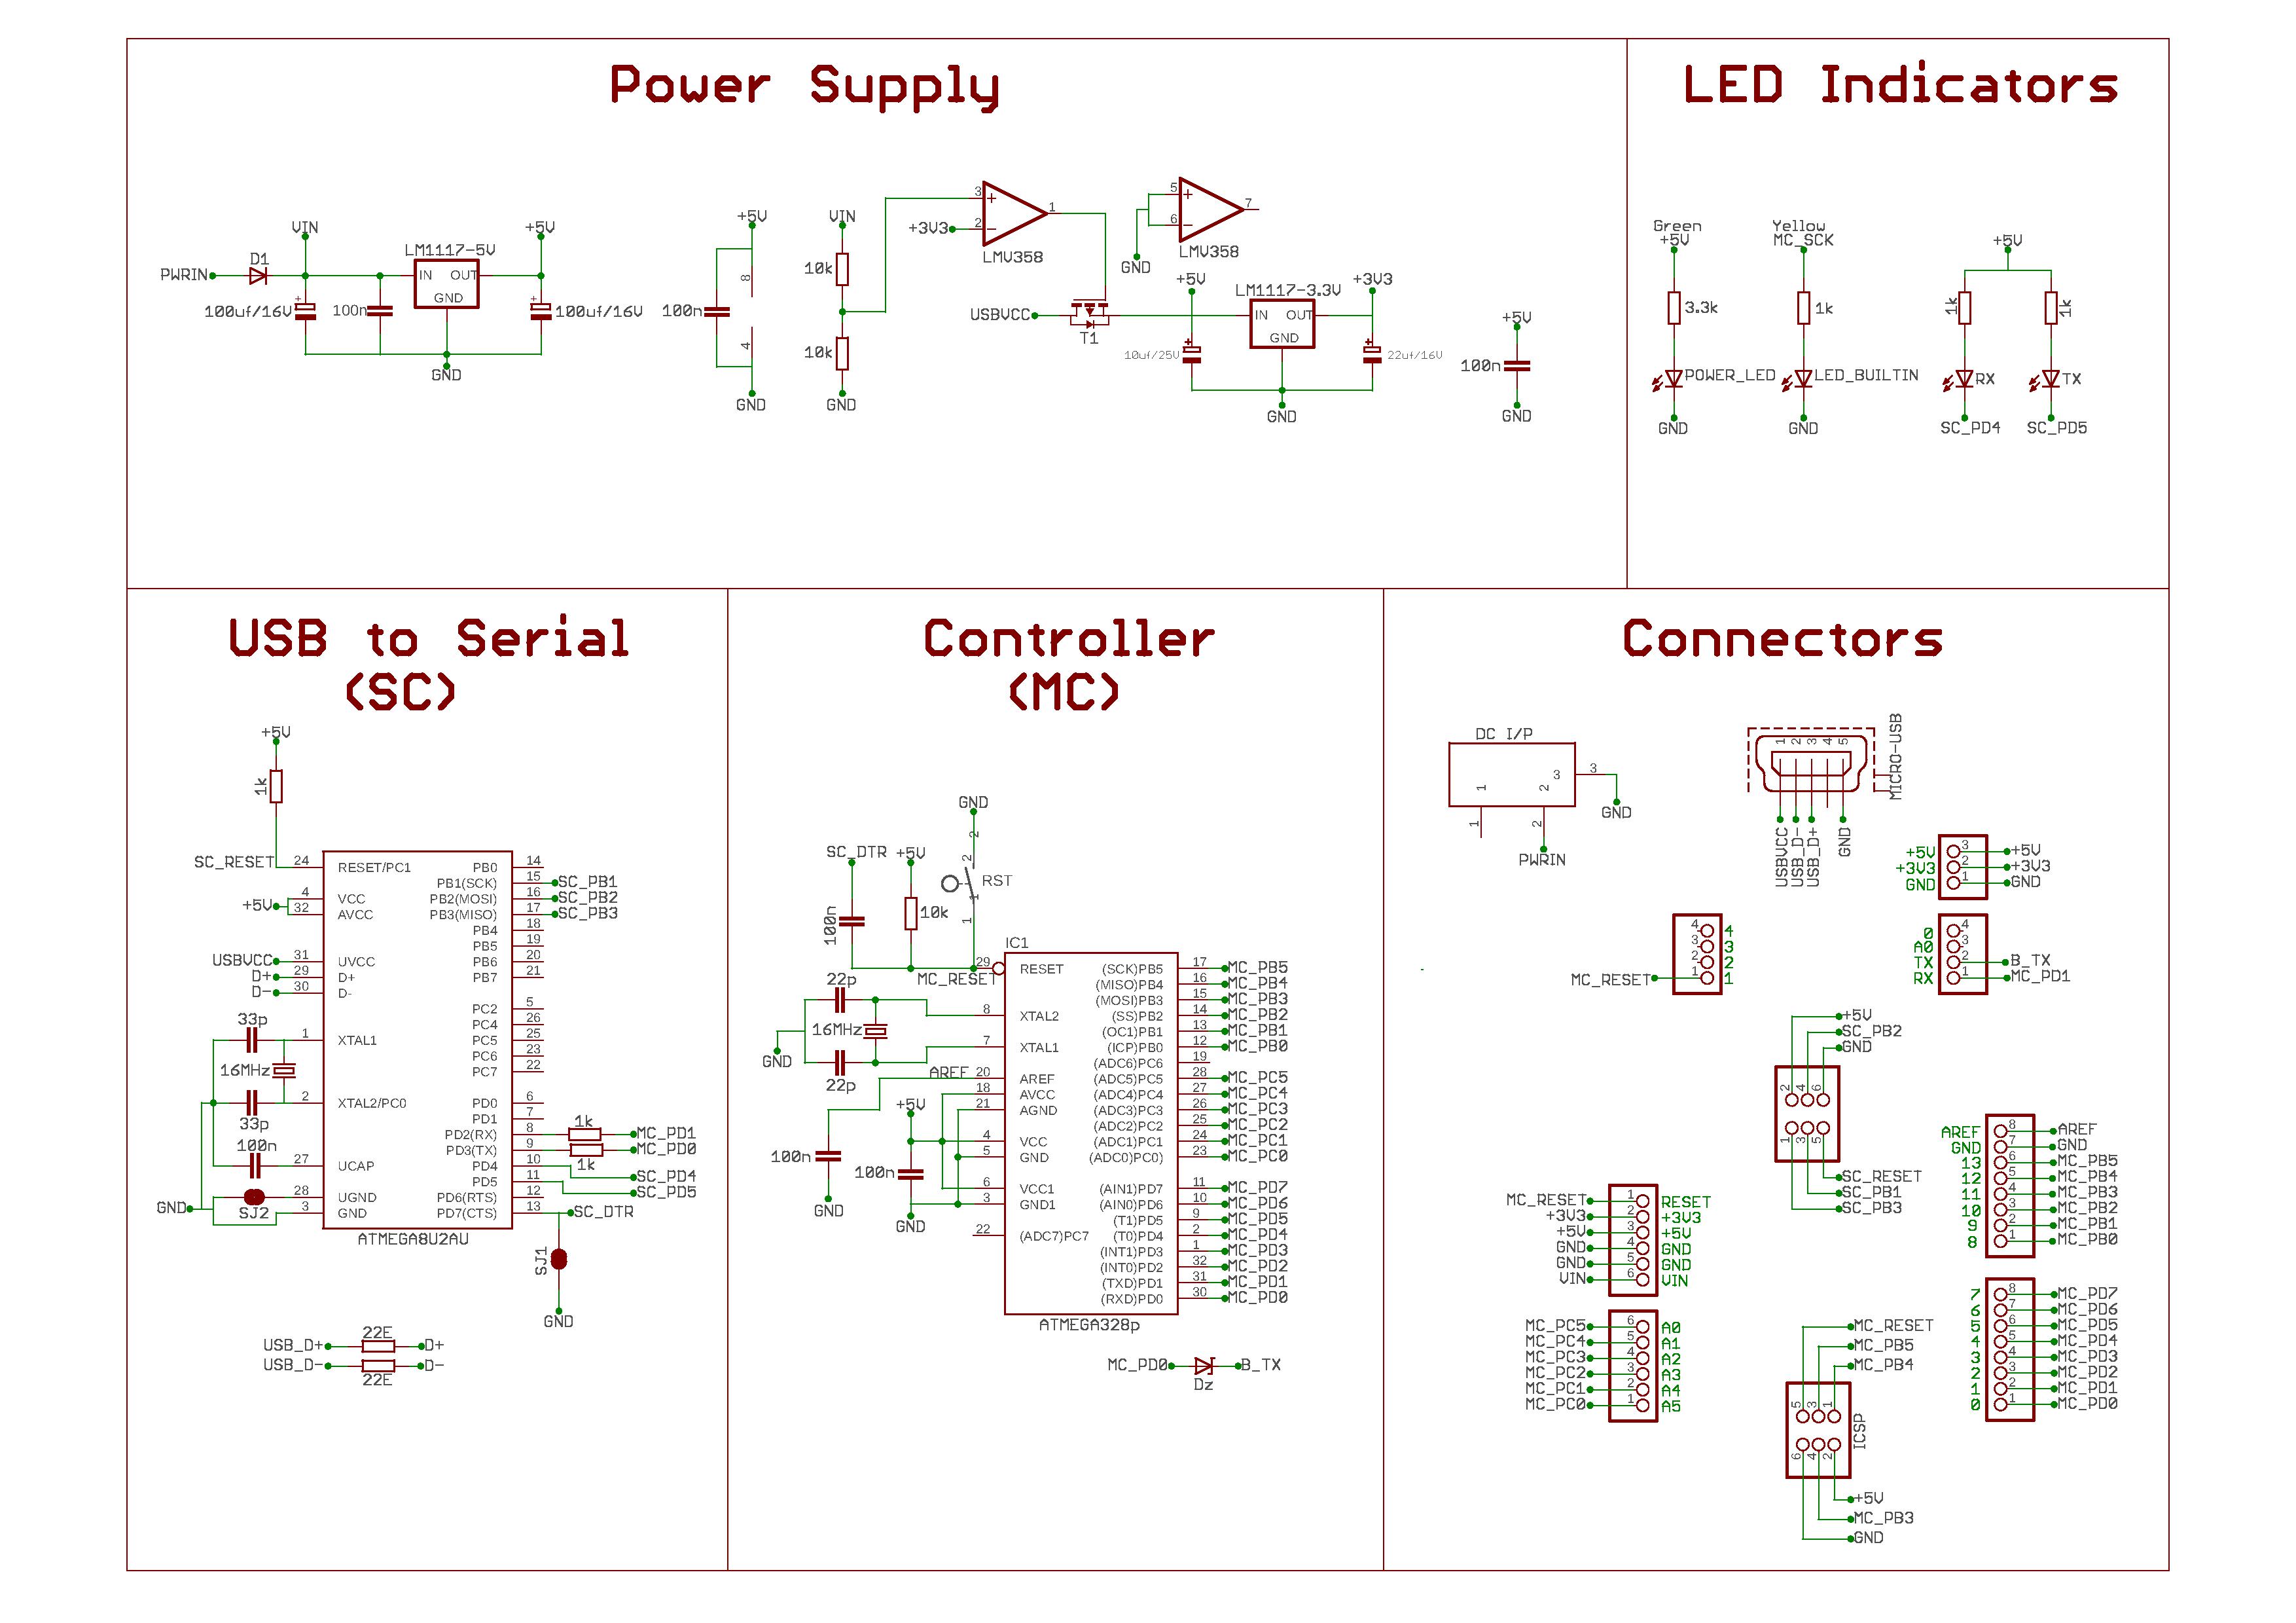
Open Source Schematic

Hardware specifications

| Microcontroller | Atmega328p-AU |
| Operating Voltage | 5V |
| DC Jack Supply Voltage (recommended) | 7-12V |
| DC Jack Supply Voltage (Absolute limit) | 6-20V |
| Digital I/O Pins | 20 (6 PWM, 6 Analog Input, 14 purely Digital I/O pins) |
| PWM Digital I/O Pins | 6 (All can be used a Digital I/O pins) |
| Analog Input Pins | 6 (All can be used a Digital I/O pins) |
| DC Current per I/O Pin | 20mA |
| DC Current for 3.3V Pin | 300mA |
| Flash Memory | 32 KB (ATmega328P) of which 0.5 KB used by bootloader |
| SRAM | 2 KB (ATmega328P) |
| EEPROM | 1 KB (ATmega328P) |
| Clock Speed | 16 MHz |
| LED_BUILTIN | 13 |
| Length | 104.0mm |
| Width | 53.4 mm |
| Weight | 50 gms |
| Programming Interfaces | Via ICSP, Via Micro USB, and Via OTA update over the Cloud |
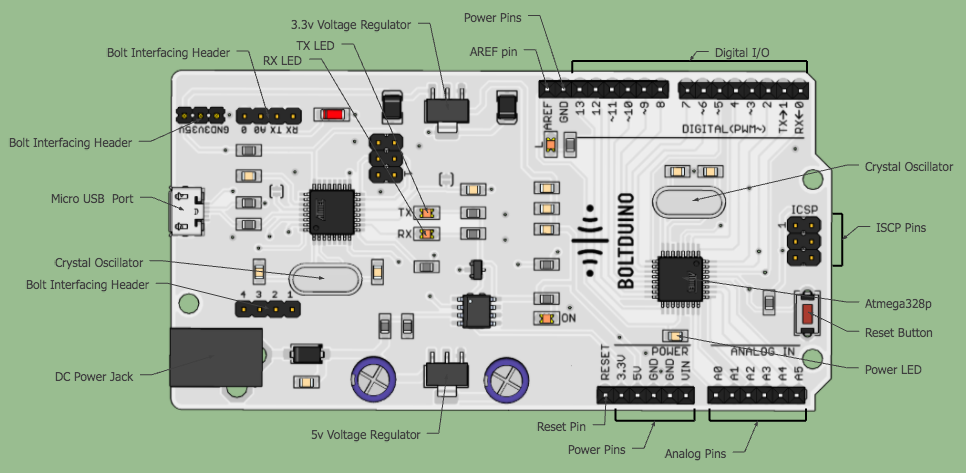
Important Parts of Boltduino

| Serial Number | Description |
|---|---|
| Micro USB Port | The Boltduino can be powered up using a Micro USB cable. All you have to do is connect one end of the cable to your computer, and the other end to the micro USB port on the Boltduino. This port also allows you to program the Boltduino as a traditional Arduino UNO. |
| DC Power Jack | The Boltduino board can be powered from the AC mains power supply by connecting it to a DC adapter with a Barrel Jack. |
| Voltage Regulator | The function of the voltage regulator is to control the voltage given to the Arduino board and stabilize the DC voltages used by the processor and other elements. The Boltduino has 2 voltage regulator. A 5v Voltage regulator which gives an output of 5 volts, and a 3.3v Voltage regulator which gives an output of 3.3 volts. |
| Crystal Oscillator | The Boltduino calculates time using the crystal oscillator. The number printed on top of the Boltduino crystal is KDS16.000. It tells us that the frequency is 16,000,000 Hertz or 16 MHz. The Boltduino has 2 crystal oscillator, one is used by the code uploaded to the Boltduino, and the other is used when you want to upload code to the Boltduino using the USB cable. |
| Reset | You can reset your Boltduino board, i.e., start your program from the beginning. You can reset the board in 3 ways. First, by using the reset button on the board. Second, you can connect an external reset button to the Boltduino pin labeled RESET. Third, you can control the digital '1' pin of the Bolt via remote API calls. Setting the pin low will put the Boltduino in reset mode while setting it to high will tell the Boltduino to start the program. |
| Power Supply Pins | 3.3V − Supply 3.3 output volt 5V − Supply 5 output volt Most of the components used with Boltduino board works fine with 3.3 volts and 5 volts. GND (Ground) − There are several GND pins on the Boltduino, any of which can be used to ground your circuit. Vin − This pin also can be used to power the Boltduino board from an external power source, like AC mains power supply. |
| Analog pins | The Boltduino board has six analog input pins A0 through A5. These pins can read the signal from an analog sensor like the humidity sensor or temperature sensor and convert it into a digital value that can be read by the microprocessor. |
| Atmega328p | The Boltduino board has its own microcontroller. You can assume it as the brain of your board. The microcontroller used is the Atmega328p from the company ATMEL. |
| ICSP pin | Mostly ICSP is a tiny programming header for the Arduino consisting of MOSI, MISO, SCK, RESET, VCC, and GND. It is often referred to as an SPI (Serial Peripheral Interface), which could be considered as an "expansion" of the output. Actually, you are slaving the output device to the master of the SPI bus. |
| Power LED indicator | This LED should light up when you plug your Boltduino into a power source to indicate that your board is powered up correctly. If this light does not turn on, then there is something wrong with the connection. |
| TX and RX LEDs | On your board, you will find two labels: TX (transmit) and RX (receive). They appear in two places on the Boltduino. First, at the digital pins 0 and 1, to indicate the pins responsible for serial communication. Second, the TX and RX LED. The TX led flashes with different speed while sending the serial data. The speed of flashing depends on the baud rate used by the board. RX flashes during the receiving process. The 2 LEDs don't normally flash if you are programming the board using the Cloud. |
| Digital I/O | The Boltduino has 14 digital I/O pins (of which 6 provide PWM (Pulse Width Modulation) output. These pins can be configured to work as input digital pins to read logic values (0 or 1) or as digital output pins to drive different modules like LEDs, relays, etc. The pins labeled “~” can be used to generate PWM. |
| AREF | AREF stands for Analog Reference. It is sometimes, used to set an external reference voltage (between 0 and 5 Volts) as the upper limit for the analog input pins. |
| Bolt Interfacing Headers | The Boltduino comes with a special set of male pins, which can be used to mount the Bolt on the Board. While mounting the Bolt ensure that the markings for 5V, 3V3, GND, 0, A0, TX, RX, 1, 2, 3 and 4 pins on the Boltduino match the pins for the Bolt. |
The End
Was this page helpful? Click here to talk to us if you faced any issues.
Click here to give us feedback regarding this documentation.
Updated over 6 years ago
