Controlling output devices (Glowing an LED)
Bolt allows you to easily build dashboards to control output devices. In this section, we will build a simple cloud dashboard to turn and LED on and OFF.
Part A: Building the circuit
Switch off before you get started
Make sure you have not powered on your Bolt Module while connecting the circuit. This will ensure that in case we make any mistake, it will not short circuit your device. Switch off the power if it is connected.
This is one of the most simple circuits you can connect to Bolt. Here are the steps:
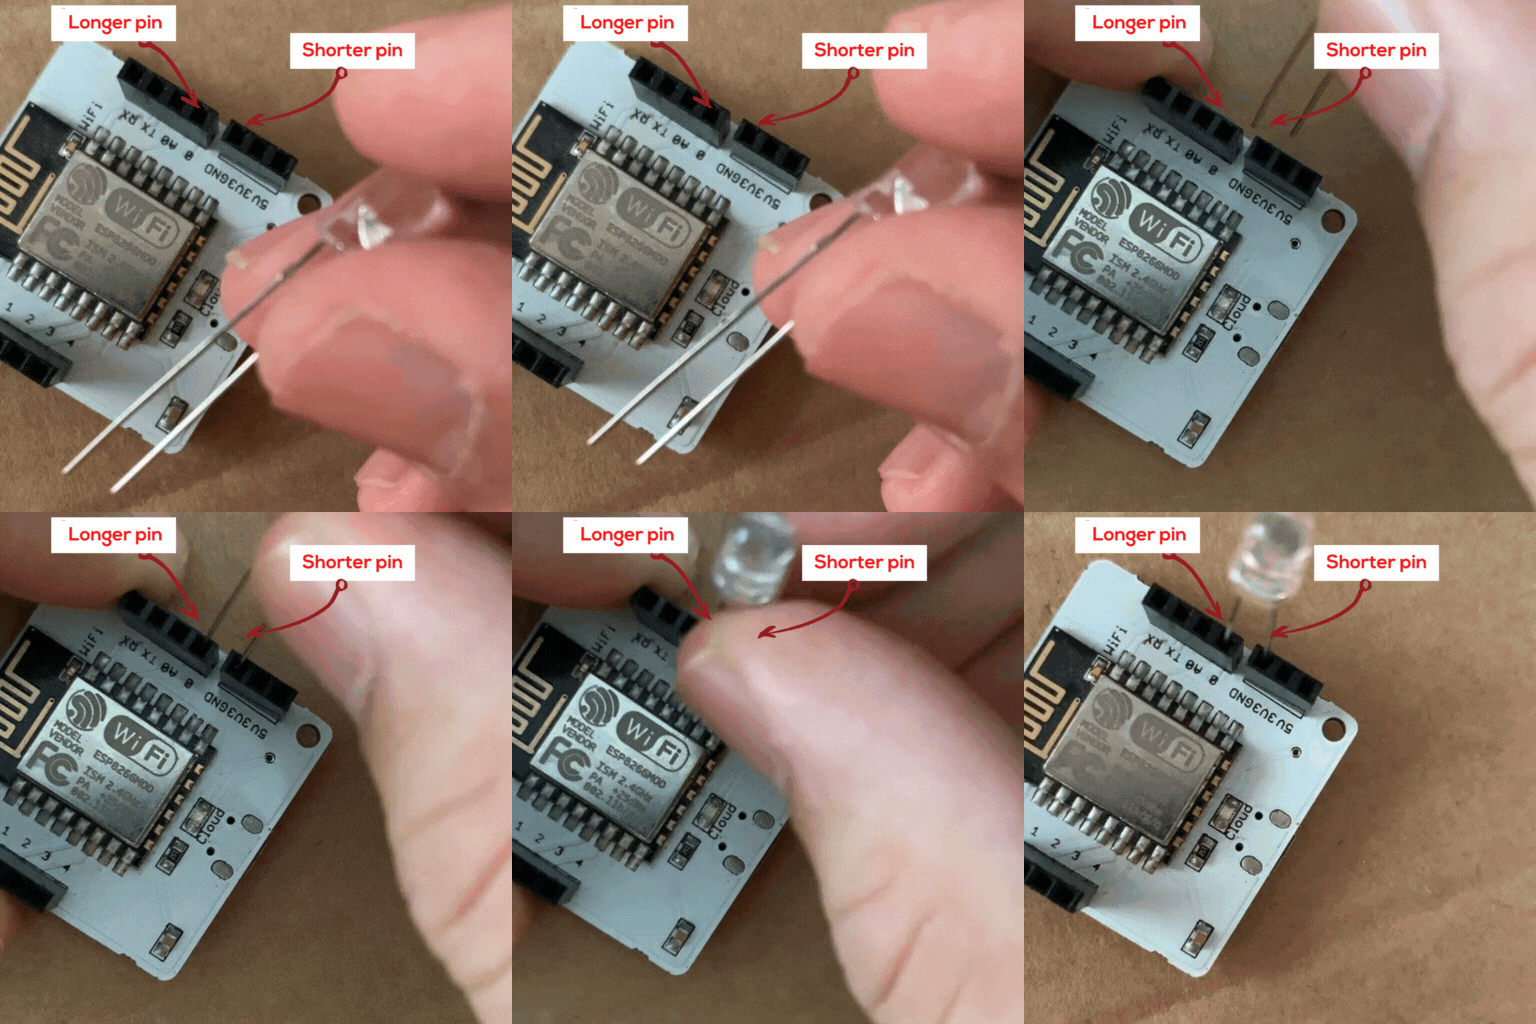
- An LED has two pins. I like to refer to these pins as legs.
- Both the pins (legs) have different lengths
- The longer leg is positive (+)
- The shorter leg is negative (-)
- Connect the longer leg to Pin 0
- Connect the shorter leg to Pin 1
Here is the short GIF explaining the steps above:

Connect the longer end of the LED to pin 0 and the shorter end of the GND pin.
Important points
- You can always connect the LED to any of the output pins. i.e. from Pin 0 to Pin 4. However, for this tutorial, we shall work with Pin 0.
- Pin A 0 is an input-only pin and you cannot control output devices to it.
Check before you power on 👀
Make sure connections are made accurately. Ideally, review them again. Wrong connections can lead to a short circuit which can further lead to the device getting damaged permanently.
- Once you have done the above steps of connection, power on your Bolt WiFi module
Hey! You did not use a resistor with the LED 😠
- We have connected the LED without a resistor. I know! Ideally, you should connect an LED with a resistor or the LED could burn.
- However, the Bolt WiFi module works at 3.3 V and not at 5 V so the LED will not get immediately damaged.
- Also, the goal of this project is to help you quick;y build a simple LED controlling circuit so I decided to keep it simple.
Part B: Connect your Bolt device to the Bolt Cloud
Skip this step, if you already know how to connect your Bolt device to the Bolt Cloud. To check if it is connected to Cloud, have a look at the green coloured Cloud LED on the Bolt WiFi module. It should be glowing.
Follow the steps in this project to set up the device and to connect your Bolt device to the Bolt Cloud: Text tutorial: Setup and build first project
Yes. I am aware that we have repeated this step. But we realised that many users tend to miss out on this step so wanted to be double sure about it. Now that our Bolt is active, we are just a step away from completing the system. 😎
Part C: Writing the code to glow the LED
Here you have two options to control the LED.
Option 1: with APIs: Super simple way. Control an LED using nothing more than a URL in a web browser.
Option 2: Cloud dashboard: This will let you build a web app with buttons. You may use these buttons to control the LED. While it lets you build a project of advanced features, with Bolt IoT Platform, this too is very simple.
We have given links to both these options under: Link to Next Steps
Updated over 3 years ago
