Python Library
The Bolt python library provides an easy to use interface of the Bolt Cloud API's.
How to use the Bolt Python library in your code?
Follow the steps given below to use the Bolt python library in your code.
- Install boltiot library first by running the below command on terminal/command line.
Note: If you face any locale error while installing Bolt python library, refer to this link.
sudo pip install boltiot
- Create your python file which will use the Bolt API library.
touch file_name.py
- Import the library in your python code.
from boltiot import Bolt
api_key = "ACXXXXXXXXXXXXXXXXXXXXXXXXXXXXXXXX"
device_id  = "BOLT1234"
mybolt = Bolt(api_key, device_id)
| Syntax | Parameter(s) | Description |
|---|---|---|
| from boltiot import Bolt | None | Import the Bolt Class from the boltiot library. |
| api_key = "ACXXXXXXXXXXXXXXXXXXXXXX" | Api Key | Assign the Bolt Cloud api key to api_key variable |
| device_id = "BOLT1234" | Device Id | Assign the device id to device_id variable |
| mybolt = Bolt(api_key, device_id) | Api key, Device id | Create an object of type Bolt and initialize the api key and device id. |
Commands
GPIO Functions
a. digitalWrite Command - Write digital output.
response = mybolt.digitalWrite('0', 'HIGH')
b) digitalRead Command - Read digital input.
response = mybolt.digitalRead('0')
c) analogRead Command - Read analog input.
response = mybolt.analogRead('A0')
d) analogWrite Command - Write analog output.
response = mybolt.analogWrite('0', '100')
UART Functions
a) serialBegin Command - Initialize serial communication.
response = mybolt.serialBegin('9600')
b) serialWrite Command - Send serial data output.
response = mybolt.serialWrite('Hello')
c) serialRead Command - Read incoming serial data.
response = mybolt.serialRead()
Utility Functions
a) isOnline Command - Get Bolt device status.
response = mybolt.isOnline()
b) restart Command - Restart Bolt device.
response = mybolt.restart()
c) version Command - Get Bolt device version.
response = mybolt.version()
Alert Notification
The Bolt python library provides an easy interface to send Email and SMS alerts using Mailgun and Twilio third-party services respectively.
a) Sending SMS
Twilio is a popular third-party SMS functionality provider. Twilio allows software developers to programmatically make and send and receive text messages using its web service APIs.
Creating an account on Twilio
- Create an account on https://www.twilio.com/try-twilio
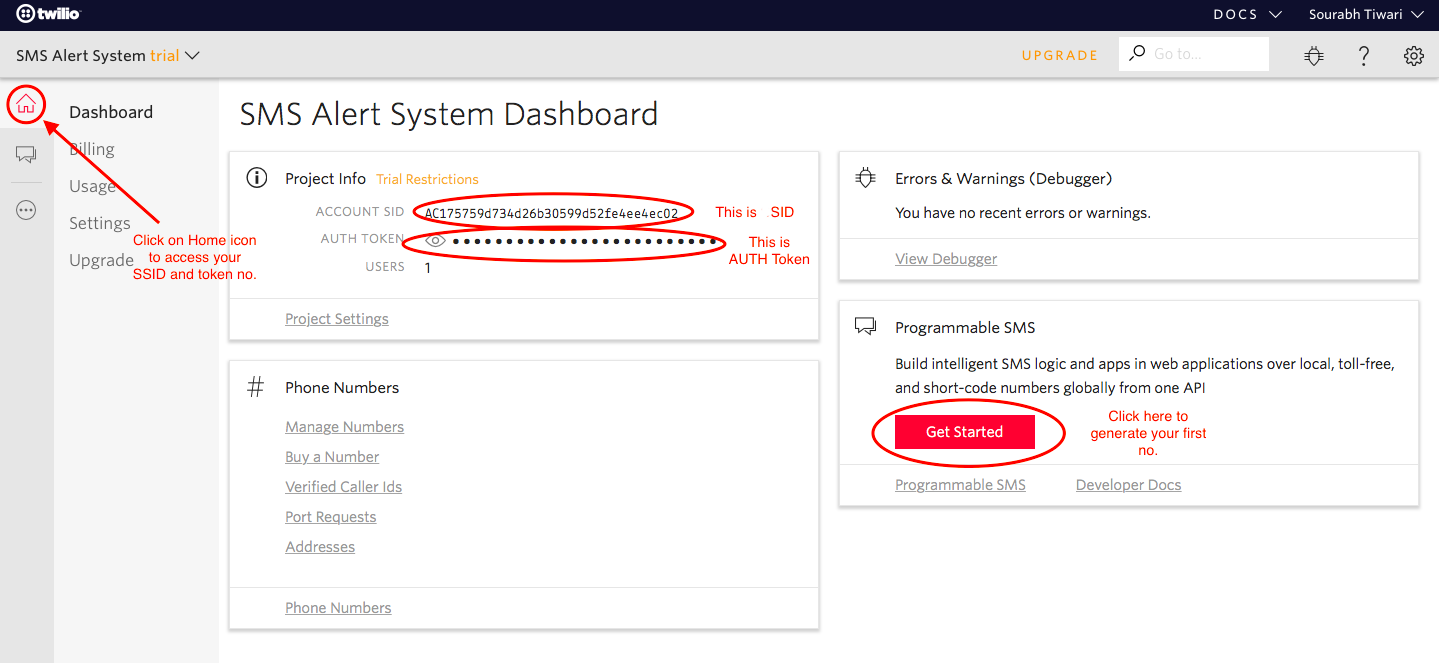
- After successfully creating the account, click on the home icon on the leftmost bar as shown in the image below. This screen will have your SID and Auth token which we will use later during coding. Copy both and save them in a text file.

- Sender number is a special number which is provided by Twilio. To generate the sender number for your twilio account click on Get Started button. Click on Get a number button.
- A popup will appear. Click on Choose this number button.
- Then you will get a number starting with '+' e.g +7192345678. Copy this number and save to text editor for future references.
That's it. Now you have your SID, auth token and sender number. We will use Bolt Python library and these Twilio values to create our own SMS Alert system.
Code Format
| Syntax | Parameter(s) | Description |
|---|---|---|
| from boltiot import Sms | None | Import the Sms Class from the boltiot library. |
| sms = Sms(SID, AUTH_TOKEN, TO_NUMBER, FROM_NUMBER) | SID, AUTH_TOKEN, TO_NUMBER, FROM_NUMBER | Create a sms object and pass all the credentials as a parameter. |
| sms.send_sms("Write your message here.") | Message Content | Message content to be sent in the SMS. |
Sample Code
from boltiot import Sms # Import SMS class from boltiot library
# Credentials required to send SMS
SID = 'You can find SID in your Twilio Dashboard'
AUTH_TOKEN = 'You can find  on your Twilio Dashboard'
FROM_NUMBER = 'This is the no. generated by Twilio. You can find this on your Twilio Dashboard'
TO_NUMBER = 'This is your number. Make sure you are adding +91 in beginning'
sms = Sms(SID, AUTH_TOKEN, TO_NUMBER, FROM_NUMBER) # Create object to send SMS
sms.send_sms("Write your message here.") # Call function to send SMS!'
b) Sending Email
Mailgun is an Email automation service. It has a very powerful set of inbuilt API functions for sending emails. Developers can send emails programmatically with the help of Mailgun API.
Creating an account on Mailgun
- Create an account on https://signup.mailgun.com/new/signup
- After successfully creating the account, scroll down to Sandbox Domain section. Click on Add Recipient button.
- Click on Invite New Recipient button. Enter the Recipient Email ID. In this case, enter your Email ID.
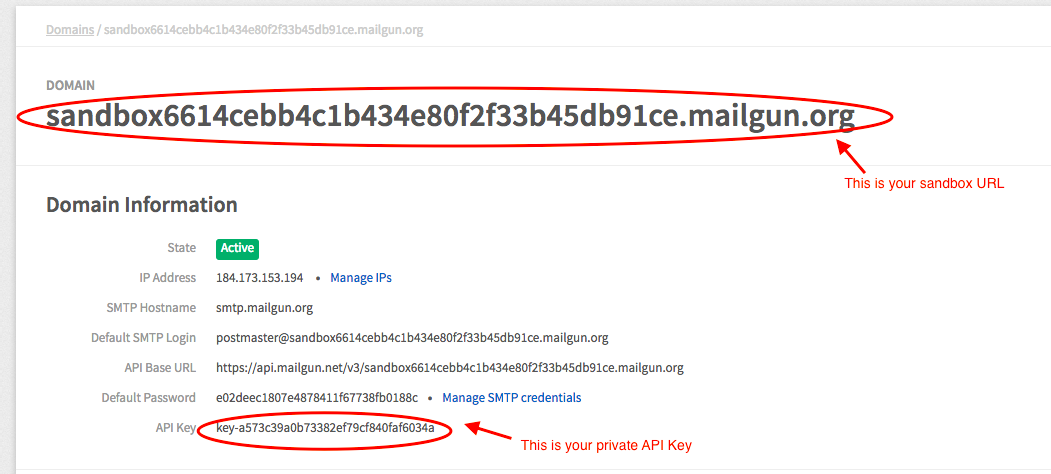
- After adding Email ID a new sandbox will be generated. Click on the ID of the newly generated sandbox. The new screen will have all the necessary credentials that you need for sending an email. Copy the Sandbox URL and the API key and save them in the text file.

That's it. Now you have your API key, sandbox URL and sender email. We will use Bolt Python library and Mailgun values to create our own Email Alert system.
Code Format
| Syntax | Parameter(s) | Description |
|---|---|---|
| from boltiot import Email | None | Import the Email Class from the boltiot library. |
| mailer = Email(MAILGUN_API_KEY, SANDBOX_URL, SENDER_EMAIL, RECIPIENT_EMAIL) | MAILGUN_API_KEY, SANDBOX_URL, SENDER_EMAIL, RECIPIENT_EMAIL | Create a mailer object and pass all the credentials as a parameter. |
| mailer.send_email("Subject", "Email Body Content") | Subject, Email Body Content | Call the send_email function to send the email. |
Sample Code
from boltiot import Email # Import Email class from boltiot library
# Credentials required to send Email
MAILGUN_API_KEY = 'This is the private API key which you can find on your Mailgun Dashboard'
SANDBOX_URL= 'You can find this on your Mailgun Dashboard'
SENDER_EMAIL = 'This would be test@your SANDBOX_URL'
RECIPIENT_EMAIL = 'Enter your Email ID Here'
mailer = Email(MAILGUN_API_KEY, SANDBOX_URL, SENDER_EMAIL, RECIPIENT_EMAIL) # Create object to send Email
mailer.send_email("Subject", "Email Body Content") # Call function to send Email
Updated over 6 years ago
